December 2014
|
December 2014 // Volume 52 // Number 6 // Tools of the Trade // v52-6tt9


LEGO Parts Organization for New Mindstorms EV3
Abstract
In this article, I provide an organizational system for the new LEGO Mindstorms EV3 Robotics System used in 4-H Robotics and the FIRST LEGO League (FLL). The system presented is for organizing the EV3 Core Kit and the EV3 Expansion Kit into a set of translucent parts trays. The article provides step-by-step instructions for obtaining needed materials and for constructing the parts inventory cards. The system allows for personalization of the parts cards to help with equipment management.
Introduction
Last summer LEGO released a new version of the popular LEGO Mindstorms Robotics System. This new version, called "EV3," is the third generation of the popular line of LEGO Mindstorms kits used in many 4-H programs (Barker & Ansorge, 2006; Ewers, 2010; Habib, 2012a; Habib, 2012b). The new EV3 includes many updates to electronics and included parts. Also last year, the Journal of Extension published a LEGO Parts Organization System developed to help manage the LEGO NXT Mindstorms Robotics System (Ewers, 2013). This current article provides an updated process for constructing the LEGO Parts Organizational parts trays that can be used for the LEGO Mindstorms EV3 Robotics System.
As a result of the 2013 JOE article on organizing the NXT robotics system, I responded to 83 requests for copies of the parts key cards for the NXT System. Based on feedback, the following are changes made for the new parts cards:
- Smaller cards to fit into trays without additional card trimming
- Better, sharper graphics of the parts shown on the cards
- Part number included to facilitate re-ordering
- Cards in additional file formats for those who don't have Publisher
This article provides a system for organizing the new EV3 Mindstorms Kits, including EV3 Core Set, Model 45544 and EV3 Expansion Set, Model 45560. While the kits can be purchased separately, these two kits are commonly used together in the 4-H Platforms activities and the FIRST LEGO League (FLL), which is why we combine both kits into one system. Figure 1 below shows the "before organization" state of both kits as returned from use at a workshop.
Figure 1.
LEGO Mindstorms EV3 Core Set (#45544) and the EV3 Expansion Set (Part #45560) After Return from a Workshop
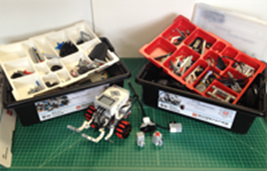
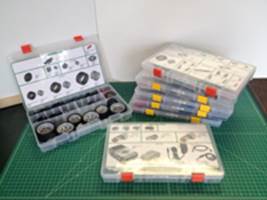
Figure 2 below shows the "after organization" state of the part trays, including parts key cards that are double sided so parts, names, and quantities can be identified from the outside when the tray is closed and also when the tray is open.
Figure 2.
The Seven Parts Trays Used to Organize the LEGO Mindstorms EV3 Kits
How to Construct a LEGO Mindstorms Organization System
- Purchase the following products:
- File crate (e.g., from office supply store). Dimensions:. approximately 14" wide x 15" long x 10"high.
- Clear Plano Stowaway parts trays (7 total):
- 4, Plano Stowaway Tray, Part Number 3701
- 3, Plano Stowaway Tray, Part Number 3750
Available through sporting goods stores and online retailers. Google Plano 3701 (or 3750) Stowaway. Note: One person responded that she had better results with a deeper (3") Tray for the intelligent brick and connector cables (Tray 7). - Obtain the Parts Key Cards file.
Request the file from tewers@uidaho.edu
File formats include: Microsoft Publisher and Microsoft PowerPoint, which can be edited, and as a PDF, which cannot be edited. - Prepare the Parts Key Cards. (Note: If using the pdf file version, skip to c).
- Open the Part Key Cards file in Microsoft Publisher or PowerPoint. All cards are included in one file. There is a front and back card for each tray.
- Compare the Part Key Cards to the inventory cards of your specific robotics kit. Make needed edits to the type and number of the parts. Do not change the size of the card. You may wish to edit the Kit # and perhaps personalize the card. I have many kits so I label them sequentially, such as Kit 5, Tray 1 (2-7) so I know which trays go together.
- Print out the cards on legal sized paper (8.5" x 14"). You will have a total of 14 pages, 2 cards per tray.
- Trim the cards along the outer border.
- Place the matching cards back-to-back and rotated so that the top of one card lines up with the bottom of the other card. Figure 3 shows the matching cards for Tray 6. Notice that the cards are trimmed along the outer border and then matching cards are sandwiched back to back and rotated so that the top edge of one card lines up with the bottom edge of the matching card.
- Laminate the matching card sets together. You should end up with 7 laminated cards.
- Cut the excess laminate off so that the card fits inside the top of the tray being careful to not break the laminate seal.
Figure 3.
Matching Card Set, Trimmed, Oriented, and Ready to Be Laminated
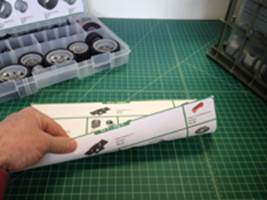
The goal here is to have a two-sided laminated card that is affixed to the inside of the top of the tray. The pictures on the card seen through the top of the tray align with the compartments inside the closed tray. When the tray is open, then the card matches the parts and compartments.
- Prepare the Trays.
- Use two-sided tape to affix the card to the inside of the tray top
- Place the tray dividers into the tray to match the parts card layout.
- Label the trays on the narrow front of each tray so that the label is visible when the trays are placed vertically in the file crate. E.g., Kit 1, Tray 1, Kit 1, Tray 2, etc.
- Sort the parts into the trays.
- Place the trays into the file crate for storage and transportation.
- Use the LEGO parts bin as a temporary storage for the robot between sessions.
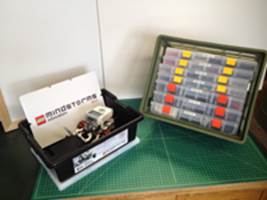
Figure 4 shows the completed system in which the parts from the two LEGO bins have been re-organized into seven parts trays, which are then contained in one file crate for storage and transportation.
Figure 4.
LEGO NXT Kits and File Crate Holding All Seven Parts Trays
Conclusion
We have found in using this system that fewer parts are lost, that youth spend less time looking for parts, and that they take much more care for the equipment. We have also observed better use of the actual part names, which are indicated on the cards. This has facilitated better communications among the youth. For example, compare, "give me the wiggly thingy," to "hand me the universal joint connector."
References
Barker, B. S., & Ansorge, J. (2006). Using robotics as an educational tool in 4-H. Journal of Extension [On-line], 44(5) Article 5IAW6. Available at: http://www.joe.org/joe/2006october/iw6.php
Ewers, T. G. (2010). Idaho robotics opportunities for k-12 students: A k-12 pipeline of activities promoting careers in science, engineering, and technology. Journal of Extension [On-line], 48(1) Article 1IAW2. Available at: http://www.joe.org/joe/2010february/iw2.php
Ewers, T. G. (2013). LEGO Parts Organization — UGH!!!. Journal of Extension [On-line], 51(3) Article 3TOT9. Available at: http://www.joe.org/joe/2013june/tt9.php
Habib, M. A. (2012a). Starting a robotics program in your county. Journal of Extension [On-line], 50(2) Article 2IAW6. Available at: http://www.joe.org/joe/2012april/iw6.php
Habib, M. A. (2012b). Robotics competitions: An overview of FIRST events and VEX competitions. Journal of Extension [On-line], 50(3) Article 3IAW3. Available at: http://www.joe.org/joe/2012june/iw3.php