December 2018
|
December 2018 // Volume 56 // Number 7 // Tools of the Trade // v56-7 tt2


Small Science: A Tool and Tips for Converting Food Science Demonstrations into Public Inquiry Experiences
Abstract
Small-scale science activities provide an opportunity for engagement of diverse, large audiences at settings such as 4-H fairs. We present practical information for implementation of small-scale food science experiences in the Extension education context. Our focus is description of a tool for adaptation of activities for inquiry-based learning and tips for miniaturization of activities to save on costs and resources.
Overview
Extension education events often involve presentations to large groups, making implementation of hands-on activities challenging. However, a hands-on component is important for involving learners in testing ideas through experimentation, which is a core concept in science and should be the "centerpiece of the scientific classroom" (National Science Teachers Association, 2004, p. 1). We were inspired by small-scale experiments in chemistry (e.g., Kimel, Bradley, Durbach, Bell, & Mungarulire, 1998) and 4-H curricula in food science (Masys & Horton, 1990; National 4-H Curriculum, 2014) to explore the use of inquiry-based food science activities for large-group events such as conferences and fairs. Here we describe a tool—developed through practical experience in the University of Wisconsin BioTrek program—that can be used to convert food science demonstrations into small-scale active-learning experiences. We also provide a complementary series of tips that can help program developers miniaturize activities for use at high-volume events.
Puzzle Builder: A Tool for Adaptation of Activities
The Puzzle Builder tool is a six-step technique that facilitates the adaptation of science-based demonstrations into smaller scale experiments presented as puzzles. Use of the tool is a method for intriguing participants at large-group events, drawing them to a booth (an "exploration station"), and involving them in quick hands-on education. The six steps are explained below. Explanation of the steps is followed by Table 1, which shows examples of application of the steps for two common demonstrations: (a) a pH indicator demonstration involving the use of cabbage juice as a natural indicator of acids (color changes to pink) and bases (color changes to green/blue) and (b) a cheese curd formation demonstration involving the use of the enzyme chymosin.
- Step 1. Catch the attention of visitors. This step can be achieved through posing a question or questions, connecting to familiar terms or concepts, and/or using a prop or image.
- Step 2. Demonstrate a method to introduce participants to your hands-on setup. The purpose of this brief demonstration is to help visitors become comfortable with how to use the tools and materials involved in the activity.
- Step 3. Guide or coach participants as they try out the materials to explore how a reference sample (acting as an experimental control) behaves. With this step, participants gain experience performing the test and actively collect scientific results.
- Step 4. Present the puzzle question (or questions). A puzzle question should provoke participants into predictions based on a combination of their past knowledge/background and their experiences in step 3. Do not provide the "answer"; instead, encourage participants to develop a plan to test the ideas they have in response to the question.
- Step 5. Have participants test their predictions using materials at the station. Participants should take the lead; provide appropriate guidance as needed depending on participant ages and/or comfort levels.
- Step 6. Facilitate the process of the participants' comparing their results to their initial predictions through a series of probing questions. Also use this time to answer follow-up questions and connect the activity to other concepts.
| Step | Cabbage chemistry activity | Cheese curds activity |
| 1. Catch attention |
Present questions:
|
Present questions:
|
| 2. Demonstrate method | Using a dropper, demonstrate adding vinegar to the well of a microwell plate containing cabbage juice. | Demonstrate adding whole milk to small sample tubes (1.5–2.0 ml microcentrifuge tubes) and mixing in an enzyme, chymosin (available from cheese-making companies), to induce formation of curds. |
| 3. Guide participants |
Let participants use droppers to move cabbage juice into three wells and then add an acid (vinegar) to one and a base (baking soda solution) to another. Ask participants whether they can think of any other examples of acids or bases in the household. |
Let participants mix a drop of chymosin with whole milk in a small tube alongside another tube without chymosin and then hold the closed tubes in their hands (or in a cup of 40°C water) to warm them and promote a reaction. Have participants watch to see whether the milk solidifies after 5 min. |
| 4. Present puzzle | Present the puzzle question "Is soda (pop) an acid or a base? How could we test that?" |
Present one or more of the following puzzle questions:
|
| 5. Test prediction |
Provide participants with clear soda, as it will not interfere with color change. Let participants add the soda to the third well of the plate and observe the color change in the cabbage juice. |
Provide a variety of milks and/or liquids, such as vinegar, for participants to use in their testing. Keep in mind the following considerations:
|
| 6. Facilitate comparing |
Ask clarifying questions:
|
Ask clarifying questions:
|
| Note. If time permits, facilitators can limit the guidance in steps 2 and 3 to allow participants to try out their own methodologies as they work on the puzzle in step 4. For example, we use an activity in which participants are asked to consider the question "Which makes better bubbles, skim or whole milk?" Facilitators share available tools with participants—small cups of milk, a tray, straws—but participants are encouraged to design and/or modify their own methodologies. | ||
While the Puzzle Builder steps may appear at first glance to be extensive for a brief activity, they actually are not. We have used this model to deliver at least 10 types of activities, such as testing foods for starches or fats and comparing the bubble-forming potential of skim versus whole milk. We find food to be familiar, accessible, inexpensive, and safe, and the explorations can be quick; for example, the cabbage module can be completed in 3-4 min. Activities to provide inspiration can be found in resources such as Watkins's (2000) Food Chemistry Experiments.
Puzzle Builder's Fit with Engagement Methodologies
The Puzzle Builder technique is notable in that it prioritizes engagement of participants with puzzles and paradoxes as they use experiments to probe and test competing ideas (Chamberlin, 1965). This approach is in contrast to a methodology centered on an exhibit or a demonstration, which results in explaining something to participants without engaging them in the scientific process. With Puzzle Builder, facilitators coach the active exploration of the puzzle by participants in an effort to transform understanding of the scientific process. Figure 1 depicts keywords describing the puzzle-based technique for exploration station delivery as contrasted with those describing an exhibit-and-explain delivery model.
Figure 1.
Keywords Describing Exhibit-and-Explain Model Versus Keywords Describing Puzzle-Based Exploration Stations
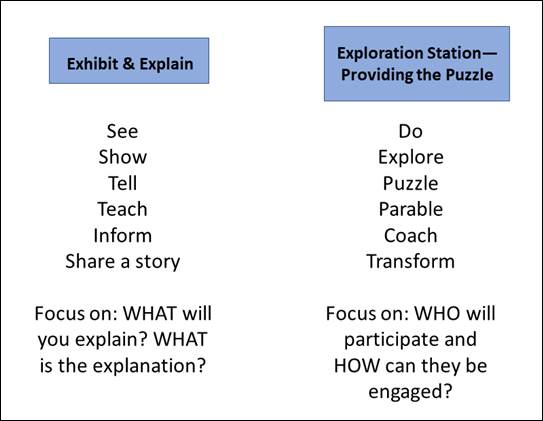
Note: Adapted with permission from How Is an Exploration Station Different from an Exhibit? by K. Smith and T. M. Zinnen, unpublished.
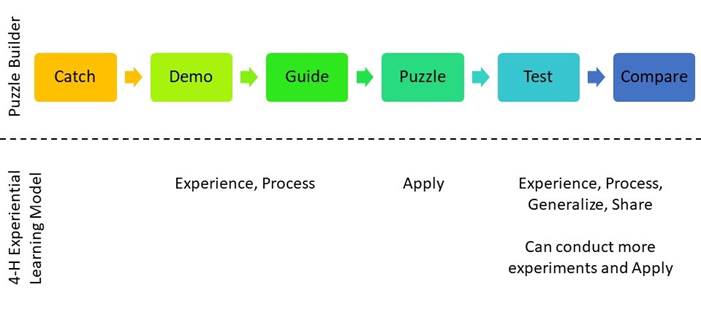
As a method that prioritizes engagement, the Puzzle Builder tool is particularly appropriate for youth science education and has multiple aspects that correspond with the 4-H experiential learning model (Kolb, 1984; Norman & Jordan, 2006). This correspondence is outlined in Figure 2.
Figure 2.
Connection of Steps in the Puzzle Builder Model with Stages of the 4-H Experiential Learning Model
Tips for Miniaturization
Using the Puzzle Builder model involves miniaturizing activities. The following tips can be used to adapt activities to a small scale, thereby resulting in money savings and reductions in waste, spillage, and volume of supplies that must be taken on the road. See Table 2 for costs of representative supplies and Figure 3 for photos of representative supplies.
- In booths, use small cups, such as plastic ketchup containers, for dispensing liquids and plastic microwell plates (available from scientific suppliers) or candy molds for mixing them. Droppers can be used to move liquid, although younger children need instruction or help with these, and care must be taken to prevent cross-contamination.
- For large simultaneous groups, consider packing materials in plastic bags and delivering materials in 1-2 ml microcentrifuge tubes. To reduce setup time, have participants obtain the needed materials for their bags in an assembly line at the event.
- Always conduct a safety risk assessment before bringing a station to an event. Use food-grade products as opposed to laboratory chemicals whenever possible, but aim to avoid common allergens such as nuts, and remind participants not to ingest any foods. We typically re-collect tubes containing milk and cheese to avoid this concern with younger audiences.
| Item | Cost per unit |
| Microcentrifuge tubes (clear, nonsterile, polypropylene, 1.5 ml) | $0.04/tube |
| 96-well plates (white plates, designed for luminescence, can be an alternative to clear plates for color-change experiments, can be washed and reused) | $5.00/plate |
| Chymosin (microbial rennet) | $0.16/ml |
| 50-ml conical tubes, with caps (disposable centrifuge tubes, polypropylene, can be washed and reused) | $0.90/tube |
| Pre-prepared cabbage juice indicator (shelf-stable, dehydrated product; as an alternative, juice can be prepared through boiling but will be perishable) | $2.50/gal (reconstituted) |
Figure 3.
Examples of Supplies for Small-Scale Science Setups at Exploration Station–Style Events
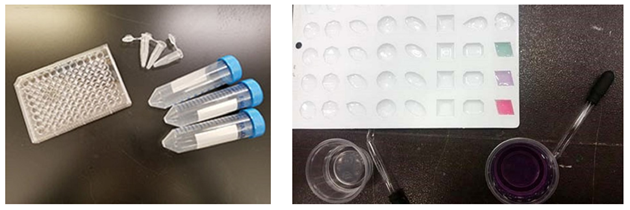
Note: Left panel. Scientific supplies. Depicted from left to right: microwell plate (clear plate shown here; can also use white luminescence microwell plates); microcentrifuge tubes (1.5 ml volume); 50-ml conical tubes. Right panel. General supplies. Candy tray (with cabbage juice experiment in progress), plastic ketchup cups for holding stocks of liquids, droppers.
Application in the Field
We estimate that food science activities in this format have been shared with at least 10,000 people in Iowa, Pennsylvania, and Wisconsin, with participants ranging from preschoolers to retirees. For example, the tool and tips were used to adapt activities for delivery to 4-H youths at Area Animal Science Day events in Wisconsin. A participating county 4-H youth development agent made the following remarks about her experience as a facilitator:
The food science-in-a-bag activities were engaging and educational for the youth who participated in Area Animal Sciences Day. The youth asked questions during the activity and were able to make applications between food for people and food for animals. It was especially beneficial to have the materials prepared and ready to use since the groups included anywhere from 15 to 75 youth and there was a short time allotted for the activity (D. Ivey, personal communication, June 1, 2015).
For such events, 4-H teens and adult leaders can serve as activity station facilitators, using training as described by Smith, Meehan, Enfield, George, and Young (2004).
Conclusion
Food is familiar, accessible, inexpensive, and safe. Many food-based experiments can be presented as puzzles and performed with few materials in short amounts of time. Therefore, small-scale science is an effective way to coach Extension audiences of all ages to develop their talents in experimental design and science savvy.
References
Chamberlin, T. C. (1965). The method of multiple working hypotheses. Science, 148, 754–759.
Kimel, H., Bradley, J. D., Durbach, S., Bell, B., & Mungarulire, J. (1998). Hands-on practical chemistry for all: Why and how? Journal of Chemical Education, 75, 1406.
Kolb, D. A. (1984). Experiential learning: Experience as the source of learning and development. Englewood Cliffs, NJ: Prentice-Hall.
Masys, R., & Horton, R. L. (1990). Science fun with dairy foods. Columbus, OH: Ohio State Cooperative Extension.
National 4-H Curriculum. (2014). What's on your plate? Exploring food science. Chevy Chase, MD: National 4-H.
National Science Teachers Association. (2004). NSTA position statement: Scientific inquiry. Retrieved from http://static.nsta.org/pdfs/PositionStatement_ScientificInquiry.pdf
Norman, M. N., & Jordan, J. C. (2006). Using an experiential model in 4-H. Retrieved from http://edis.ifas.ufl.edu/4h243
Smith, M. H., Meehan, C. L., Enfield, R. P., George, J. L., & Young, J. C. (2004). Improving county-based science programs: Bringing out the science teacher in your volunteer leaders. Journal of Extension, 42(6), Article 6FEA5. Available at: http://www.joe.org/joe/2004december/a5.php
Watkins, B. A. (2000). Food chemistry experiments. Retrieved from https://naitc-api.usu.edu/media/uploads/2017/06/16/experiments_foodscience.pdf