October 2015
|
October 2015 // Volume 53 // Number 5 // Tools of the Trade // v53-5tt10


Planning and Conducting Field Demonstration Tours
Abstract
Extension personnel, agricultural companies, and contract researchers invest a great deal of resources through time, money, and manpower to educate crop consultants, producers, students, and new employees. Creating an in-field, real world, and hands-on learning environment affords an opportunity to engage individuals to learn in ways that cannot be readily duplicated in a classroom setting. However, planning and conducting field demonstrations takes time and foresight. Clear objectives, teamwork, and adequate resources are vital. The information provided in this article is intended to serve as a "roadmap" of the key elements that will lead to a successful field demonstration tour.
Introduction
In-field, real world, and hands-on learning environments provide the opportunity to engage individuals in ways that cannot be readily duplicated in a classroom setting. This process of learning is further enhanced when participants are not only provided the opportunity to "see" what is being taught, but also what can be done with this new information (Richardson, 1994). Agricultural field demonstrations offer this opportunity (Glen, Moore, Jayaratne, & Bradley, 2014; Hancock, 1992). One group of individuals who prefer this learning method is farmers (Franz, Piercy, Donaldson, Westbrook, & Richard, 2010). By attending a field tour that was well executed, the audience likely learned a great deal and felt the time was well invested. However, if you have never been involved in planning and delivering a field tour, it's likely that your perspective is limited concerning the amount of time and energy that is truly involved in executing a successful event. This article is designed to shed light on this subject to help others plan, organize, and deliver a field demonstration tour.
Planning Timeline
For the purpose of this article, we will focus on a larger scale tour that encompasses multiple tour stops, speakers and disciplines. Checklists and timelines are important tools to help make the field day a success (Hawkins & Southard, 2001).
The most important element in implementing a successful field demonstration is to begin the planning process early. Please note the timeline in Table 1 pertains to demonstrations of activities that occur early in a cropping cycle; for example, early season weed control. Late season insect demonstrations may require the establishment of trap crops the spring or summer prior to the tour date.
| Time Prior to Date | Activity |
| 8-10 months | Identify learning objectives and key stakeholders |
| Select demonstration plot project lead | |
| Establish an implementation team Gain consensus on roles and responsibilities, e.g., who will do what by when | |
| Select site location, consider access, parking and safety precautions | |
| 6 months | Draft protocols developed, include key messages Identify tour group leaders |
| 4 months | Develop draft agenda and communicate it with key stakeholders and implementation team |
| Protocols finalized, include tour flow and demonstration plot layout | |
| 2-3 months | Product sample material/crop inputs (seed, pesticides, etc.) ordered |
| Order materials (stakes, treatment signs, flags, tents, table & chairs, restrooms etc.) | |
| 2 months | Develop the tour flow plan, including safety requirements |
| 1-4 weeks | Install field demonstration plots |
| Finalize tour agenda and communicate to key stakeholders, implementation team and tour group leaders | |
| Develop a participant survey to measure results, gain feedback | |
| 1-2 weeks | Ensure demonstration plots support protocols and tour objective(s) |
| 4-7 days | Review plot demonstrations with tour group leaders and stakeholders and agree on key messaging |
| 0 days | Conduct the tour |
| Debrief: follow up with each tour group leader, share experiences, make adjustments for the next tour | |
| 0 days | Gather feedback from participants through the survey, make adjustments for future tours as needed |
Objectives
The tour objective should be agreed upon well in advance by all key stakeholders. The protocol objective for each field demonstration must be in alignment with the tour objective. A learning objective also needs to be included for each protocol so that all parties involved understand the desired outcome for each demonstration: what concepts are participants to understand, do, or apply.
Teams/Roles/Responsibilities
The most successful field demonstration tours are the result of three primary teams working effectively together. It is critical that all teams and the members involved understand their responsibilities and the responsibilities of others. Each team achieving its respective goals is critical to a successful demonstration (Figure 1). The names and responsibilities vary across organizations and locations, but each team must be held accountable for the assigned responsibilities.
Figure 1.
Team Alignment & Responsibilities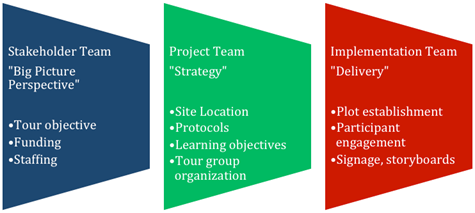
The demonstration project leader ensures that all parties involved understand their roles and expectations and also manages and coordinates the overall project. This individual should work closely with representatives from the each of the three teams detailed in Figure 1: Stakeholder Team, Project Team, and Implementation Team. This person also serves as the focal point for managing the team that will deliver the objective of the tour.
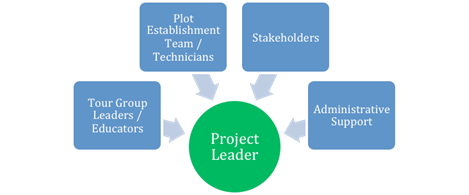
Figure 2.
Roles & Responsibilities Alignment
Fine Tuning & Final Preparations
Careful logistical planning and attention to the tour timeline are very important to the success of a tour. The project leader needs to work closely with the educators, plot establishment teams, key stakeholders, and administrative support staff as the tour date approaches (Fig. 2). Table 2 provides an outline of the activities and timing.
| Time Prior to Tour Date | Activity |
| 2-3 months |
Determine tour logistics.
|
| Identify tour participants / customers | |
Send initial communication to tour participants.
|
|
| 1-2 months | Develop tour agenda. |
Provide tour details to participants / customers.
|
|
| 2-8 weeks | Make arrangements for food and refreshments. |
| 1-3 weeks | Prepare plot signs. |
Preview tour site. Ensure that site meets the tour objective.
|
|
| 1-3 weeks | Make adjustments to tour flow as needed Determine the number of tour stops and time allowed for each stop. Install tents and restrooms. Discuss & develop methods to engage the participants to maximize learning and delivery of key messaging. |
| 0-2 days | Install plot signs and ensure that plots are in top condition for the tour. |
| Review tour flow and key messaging with all tour leaders and key stakeholders so all parties clearly understand the tour plan. Ensure that tour leaders are in agreement regarding what the plot demonstrates and the key learning points. |
Delivery
Prior to the start of the tour, participants should understand the objectives of the tour and details of the products and technologies need to be communicated clearly. This may be accomplished by dividing the tour into four parts. These are: the tour briefing, introduction of each tour stop, management of the message, and the tour wrap-up. Below are some suggestions for the four main parts of the tour.
Tour Briefing
- Introduce the staff & tour group leaders.
- Review the agenda for the day, logistics, safety, restrooms, meals, etc.
- Review the tour objectives, key product concepts, and time schedule.
Introduction of Each Tour Stop
- Provide the objective for the tour stop and how the demonstration was established.
- Tell participants how much time they have at the site.
- Ask participants to identify the points of interest to engage them and ensure that they know specifically what to look for in the demonstration.
Management of the Message
Unless the message and conclusions from each demonstration are managed, the value and impact of the tour stop may be lost. You can ensure that the conclusions from the tour stop are understood either by describing key results and conclusions before participants enter the plots or by having a short discussion session (2-3 minutes) after each tour stop to discuss observations and impressions by participants. Stress the key message at each site before the group moves on.
Tour Wrap-up
It is important to close the tour with confidence and enthusiasm. Ensure a common understanding of what was observed, summarizing tour observations and identifying any follow-up actions. Be sure to thank the participants for taking the time to visit your tour.
Evaluation of Tour
Upon the completion of the tour, allow each participating individual the opportunity to evaluate the tour via a survey. Survey results can measure the impact your tour had on these individuals and will provide feedback on how to improve the learning experience of the participants (Shepard, 2001). The survey can also provide insight to the project team and key stakeholders for use in evaluating the investment of the time and resources.
Summary
In-field, hands-on learning affords a tremendous opportunity to engage individuals in ways that cannot be readily duplicated in a classroom setting. Through careful and early planning, Extension educators and agricultural scientists can leverage field demonstrations to create an environment of experiential learning and maximize learning retention. Implementation requires that all key players work effectively together, and each team, with clearly defined responsibilities, is accountable to achieve its respective goals. This "roadmap" has been successfully implemented across dozens of locations in the U.S., helping tens of thousands of farmers and students better understand agriculture and new technologies.
References
Richardson, J. (1994). Learning best through experience. Journal of Extension [On-Line], 32(2) Article 2FEA6. Available at: http://www.joe.org/joe/1994august/a6.php
Glen, C., Moore, G., Jayaratne, K. ,& Bradley, L. (2014). Use of demonstration gardens in Extension: Challenges and benefits. Journal of Extension [On-Line], 52(4) Article 4FEA6. Available at: http://www.joe.org/joe/2014august/a6.php
Hancock, J. (1992), Extension education: Conducting effective agricultural demonstrations. Retrieved from: http://www2.ca.uky.edu/agc/pubs/id/id111/id111.htm
Franz, N., Piercy, F., Donaldson, J., Westbrook, J., & Richard, R. (2010). Farmer, agent, and specialist perspectives on preferences for learning among today's farmers. Journal of Extension [On-Line], 48(3) Article 3RIB1. Available at: http://www.joe.org/joe/2010june/rb1.php
Hawkins, S., & Southard, B. (2001). Field tours—An old tool that can still work. Journal of Extension [On-Line], 39(1) 1TOT4. Available at: http://www.joe.org/joe/2001february/tt4.php
Shepard, R. (2001). Questionnaires for evaluating on-farm field days. Journal of Extension [On-Line], 39(1) Article 1TOT5. Available at: http://www.joe.org/joe/2001february/tt5.php