June 2013
|
June 2013 // Volume 51 // Number 3 // Tools of the Trade // v51-3tt9


LEGO Parts Organization—UGH!!!
Abstract
In this article, I describe a method for organizing one of the more popular Robotics Sets, NXT LEGO Mindstorms, a set used for the 4-H Robotics Platforms Curriculum and the FIRST LEGO League (FLL). LEGO Mindstorms is available in various retail configurations. And LEGO modifies the base product from year to year. The parts organization shown here is for the FLL configuration of the Mindstorms product, which consists of the LEGO Mindstorms Education Base Set (Part #9797), the Educators' Resources Set (Part # 9648), the rechargeable battery and power supply, and the LEGO NXT-G Programming Software.
Introduction
With the tremendous growth of robotics offered through 4-H (Barker & Ansorge, 2006; Ewers, 2010; Habib, 2012a; Habib, 2012b), I thought it timely to share a solution for maintaining and managing the LEGO equipment.
Problem
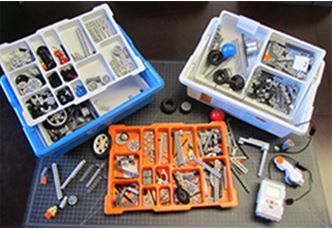
Equipment inventory: Need a simpler and more efficient way to keep LEGO parts organized and inventoried. Figure 1 below shows the LEGO bins with the sorting trays provided by LEGO. In practice, the parts get mixed, making it harder to find parts and to conduct inventory when the kits are returned.
Figure 1.
LEGO Mindstorms NXT Educators Resource Set (Blue Bin, Part #9648) and the LEGO Mindstorms Education NXT Base Set (White Bin, Part #9797)
Solution
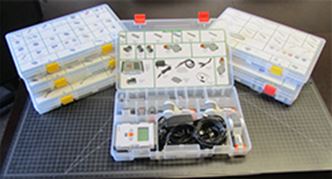
Figure 2 shows the parts trays with compartments for each type of part and with a parts organization chart showing type, number, and location for each part.
Figure 2.
The Six Parts Trays Used to Organize the LEGO Mindstorms Kits
How to Construct a LEGO Mindstorms Organization System
- Purchase the following products:
- File crate (e.g., from office supply store). Dimensions: approximately 14" wide x 15" long x 10"high.
- Clear Plano Stowaway parts trays (6 total):
- 4, Plano Stowaway Tray, Part Number 3701
2, Plano Stowaway Tray, Part Number 3750
Available through sporting goods stores and online retailers. Google Plano 3701 (or 3750) Stowaway
- Obtain the Parts Key Cards file.
Request the file from tewers@uidaho.edu
The file is a Microsoft Publisher document.
- Prepare the Parts Key Cards.
- Open the Part Key Cards file in Microsoft Publisher. All cards are included in one file. There is a front and back card for each tray. The back card has small triangles at the bottom to show where to cut (Cards 1-4 only).
- Compare the Part Key Cards to the inventory cards of your specific robotics kit. Make needed edits to the type and number of the parts. Do not change the size of the card. You may wish to edit the Kit # and perhaps personalize the card.
- Print out the cards on legal sized paper (8.5" x 14"). You will have a total of 12 pages, 2 cards per tray.
- Cut the borders off the cards along the outer border.
- Place the matching cards back-to-back and rotated so that the top of one card lines up with the bottom of the other card. Figure 3 shows the matching cards for Tray 1. Notice that the cards are trimmed along the outer border and then matching cards are sandwiched back to back and rotated so that the top edge of one card lines up with the bottom edge of the matching card.
- With both matching cards lined up, back-to-back and top to bottom, cut out the triangle on the bottom of card sets 1-4 so that the cards to fit around the plastic hinge supports in the trays. Pre-fit the cards to determine the trimming needed. Cards 5 & 6 do not need extra trimming.
- Laminate the matching card sets together. You should end up with 6 laminated cards.
- Cut the excess laminate off so that the card fits inside the top of the tray being careful to not break the laminate seal.
- Trim the laminated cards around the hinge supports for trays 1-4 so that they will fit flat against the inside of the tray tops.
Figure 3.
Matching Card Set, Trimmed, Oriented, and Ready to Be Laminated
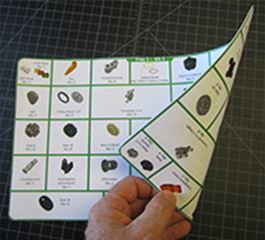
The goal here is to have a two-sided laminated card that is affixed to the inside of the top of the tray. The pictures on the card seen through the top of the tray align with the compartments directly beneath, inside the closed tray. When the tray is open, then the card shows what the parts and compartments should look like.
- Prepare the Trays.
- Use two-sided tape to affix the card to the inside of the tray top so that it lines up with the compartments below.
- Place the tray dividers into the tray to match the parts card layout.
- Modify Tray 6 so that the LEGO Brick can fit. Clip (remove) the divider holder on the floor of the tray where the brick is stored.
- Label the trays on the narrow front of each tray so that the label is visible when the trays are placed vertically in the file crate. E.g., Kit 1, Tray 1, Kit 1, Tray 2, etc.
- Sort the parts into the trays.
- Place the trays into the file crate for storage and transportation.
- Use the LEGO parts bin for the red and blue balls, the build guide, and/or to tote the robot.
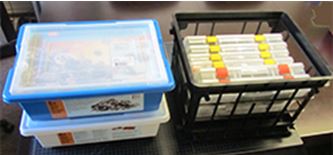
Figure 4 shows the completed system in which the parts from the two LEGO bins have been re-organized into six parts trays, which are then contained in one file crate for storage and transportation.
Figure 4.
LEGO NXT Kits and File Crate Holding All Six Parts Trays
Equipment Checkout Procedure
- Inform the users:
- They need to conduct an inventory to confirm the completeness of the kit themselves, comparing the type and number of parts in each tray.
- They need to check to see if the LEGO brick is functional and that it has adequate battery voltage.
- They are responsible for returning the kit in the same functional, complete, and organize manner in which they received it.
- They need to inform you if parts are lost or broken.
There are three immediate benefits to this step. Youth: 1) readily see the variety of parts available; 2) save time searching for parts; and 3) they are responsible for each and every part in the kit.
- As youth use the kit, encourage them to put parts away if they are not using them.
- At the end of the session, instruct youth to disassemble the LEGOs and return them to the parts containers as indicated on the Kit Parts Cards in each tray.
- When youth return kits, examine the kit and return it if any parts are out of place or missing, damaged, soiled, etc. Youth must return it the way they found it.
Conclusion
This system for organizing the LEGO parts is proving to save both youth and leaders time.
- Total Cost: ~$45/set
- Total Time to Construct: 2-3 hours
- Time saved: Priceless
References
Barker, B. S., & Ansorge, J. (2006). Using robotics as an educational tool in 4-H. Journal of Extension [On-line], 44(5) Article 5IAW6. Available at: http://www.joe.org/joe/2006october/iw6.php
Ewers, T. G. (2010). Idaho robotics opportunities for k-12 students: A k-12 pipeline of activities promoting careers in science, engineering, and technology. Journal of Extension [On-line], 48(1) Article 1IAW2. Available at: http://www.joe.org/joe/2010february/iw2.php
Habib, M. A. (2012a). Starting a robotics program in your county. Journal of Extension [On-line], 50(2) Article 2IAW6. Available at: http://www.joe.org/joe/2012april/iw6.php
Habib, M. A. (2012b). Robotics competitions: An overview of FIRST events and VEX competitions. Journal of Extension [On-line], 50(3) Article 3IAW3. Available at: http://www.joe.org/joe/2012june/iw3.php